U.S. Department of Transportation
Federal Highway Administration
1200 New Jersey Avenue, SE
Washington, DC 20590
202-366-4000
![]()
![]()
![]()
April 2015
FHWA-SA-15-034
View the PDF Version [32 KB]
You will need the Adobe Reader to view this PDF.
Rumble Strip Installation Considerations
Longitudinal rumble strips are an effective, low-cost countermeasure for preventing roadway departure crashes, including both run-off-road and opposing-direction crashes. Rumble strips1,2 are milled or raised patterns near the center line or edge line of the roadway that provide both an audible warning (rumbling sound) and a physical vibration to alert drivers that they are crossing into opposing traffic or leaving the roadway. Rumble strips placed underneath center line or edge line striping are often referred to as "rumble stripes."
Rumble Strip Basics. There are two main applications for rumble strips:
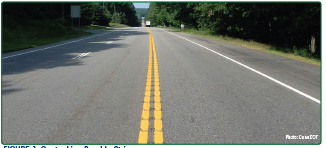 FIGURE 1. Center Line Rumble Strips |
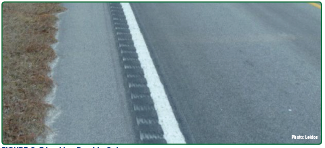 FIGURE 2. Edge Line Rumble Strips |
Pavement Concerns Related to Rumble Strips. There are many pavement-related variables that play an important role in the successful implementation of rumble strips, such as:
Previously, there were concerns in the pavement community that heavy traffic or harsh weather conditions would cause pavement deterioration where milled rumble strips were present. In 2014, Ohio DOT conducted a nationwide survey of pavement engineers through the AASHTO Research Advisory Committee (RAC) in which the agency requested information from other States on pavement deterioration and maintenance issues with center line rumble strips. Most of the 24 responding States indicated only isolated locations experiencing accelerated pavement deterioration along the joint, and several comments indicated these were locations where the joint or pavement were not in good condition prior to installation of the rumble strips.
Snow plowing has little or no effect on milled rumble strips. Snow plow operators have indicated rumble strips are actually helpful to them in detecting the edges of the lane. In locations that plow snow, however, raised rumble strips are not recommended as the raised profile may be damaged during plowing.
It is possible for rumble strip installation to have little to no impact on new or existing pavements if several critical variables are properly considered. The following provides practices with respect to each of these variables from States with successful rumble strip installations.
Knowing pavement history – age, condition, type, and thickness – is important in determining whether existing pavements are suitable for standard rumble strip installation or if modified dimensions or types of rumble strips may be appropriate. This can become somewhat complicated in cases where one or more maintenance treatments have been applied over the original surface. Addressing existing rumble strips during pavement maintenance is discussed in the section for "Maintaining Rumble Strips during Pavement Maintenance.
Age and Condition
Pavement condition should be considered before installing rumble strips in existing pavement. Although milled rumble strips do not typically cause issues when installed in pavement rated fair or better, in older pavements that show high degrees of deformation or cracking distress, the milling process can exacerbate existing issues. Michigan DOT milled rumble strips into asphalt pavements of all ages rated fair or better and found that very few issues resulted. Where milling existing pavement is not feasible due to pavement condition, agencies may consider installing raised rumble strips or profiled markings; however, it is likely that reduced safety benefits will be experienced if the dimensions of the raised rumble strips are significantly less than the milled dimensions.
Pavement Type and Thickness
Rumble strips can be milled into both new and existing asphalt and Portland cement concrete (PCC) pavements. Keep in mind, however, that rumble strips are not normally applied to bridge decks due to the presence of rebar. All pavements (PCC, asphalt, ultra-thin asphalt, chip seal, micro-surfacing, etc.) need to have a minimum thickness of "bound" pavement material before rumble strips are installed. "Bound" pavement materials are a combination of all layers of the materials listed above but do not include cold-in-place (CIP) recycling. In general, the thickness of the most recent overlay needs to exceed the depth of the rumble strip so that the previous layers of pavement are not exposed, which would allow moisture to infiltrate and compromise their integrity. Due to the increasing interest and use of preventive pavement treatments, such as ultra-thin asphalt overlays, chip seals, and micro-surfacing, DOTs are experimenting with rumble strips, so knowledge on the topic continues to grow. Recent experience in Michigan has found that preventive maintenance treatments such as ultra-thin hot mix asphalt and micro-surfacing can be compatible with rumble strips. Microsurfacing and ultra-thin hot-mix asphalt overlays fill in existing pavement deformations such as ruts and rumble strips, but rumble strips can be cut into the overlay without significant delamination.
Milling into a chip seal is more of a challenge, however. Washington State DOT's guidance is as follows:
Placement of recessed lane markers and rumble strips is discouraged on [chip seal] roadways due to insufficient surfacing depth. If recessed lane markers or rumble strips are used, the existing [chip seal] surfacing should have a total thickness of [4 inches] which can include any combinations of [chip seal] and [asphalt] applications. [Milling] rumble strips on [chip seal] roadways exposes the previous layers of [chip seals]. Exposure to moisture accumulation and freezing and thawing often leads to delamination. To reduce the possibility of delamination occurring at rumble strip locations, rumble strips shall be [milled] followed by the [chip seal] application.5
It is best to apply chip seal after rumble strips have been installed rather than before; however, the chip seal will reduce the rumble strip dimensions by the size of aggregate used, thereby reducing their effectiveness. An agency may wish to consider somewhat larger rumble strip dimensions if application of a chip seal is expected within a few years of installation.
States have slightly different requirements for pavement thickness to ensure the pavement integrity is not compromised by rumble strip installation. Some States specify requirements based on pavement age. In Pennsylvania, for example, pavement that is new or less than a year old is deemed suitable for rumble strip implementation if asphalt pavement thickness is at least 1.5 inches. Existing concrete pavements, however, must have a minimum overlay depth of 2.5 inches. Other States have general requirements without age specifications, as shown in Table 1. When milling asphalt, it is important to ensure that the thickness of the top lift exceeds the depth of the rumble strip, otherwise there is a risk of compromising the integrity of the overlay when the rumble strips are installed.6 It is typically preferable to adjust the depth of the rumble strip rather than to eliminate this safety feature.
| State | Required Pavement Thickness for Rumble Strip Implementation by State |
|---|---|
| Missouri | 1.75" |
| New York | 2.5" |
| Pennsylvania | Less than 1 year old – 1.5" Older – greater than 2.5" |
| Texas | 2.5" |
| Washington | 3" |
In NCHRP Report 641, Tables 6 and 7 illustrate that States and territories handle the location of rumble strips in relation to the center longitudinal joint or shoulder joint very differently. In surveys and interviews, many States have indicated that the locations of the joints are not typically deciding factors in determining whether or not center line, shoulder, or edge line rumble strips should be installed. In addition, most States indicate very limited problems with rumble strips that cross joints, except where joints are already in poor condition. Where there is a concern for pavement condition, agencies may use a lateral offset to avoid cutting the rumble strips directly into the joint using the methods described below.
For center longitudinal joints:
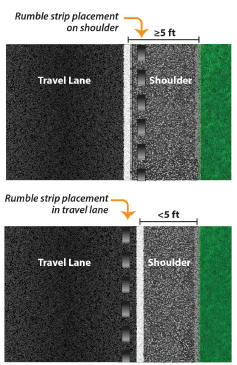
For the travel lane/way and shoulder joints:
Missouri DOT reports avoiding the shoulder joint to some extent, although the agency has not actually found issues with milling through the joint when it is not possible to offset the rumble strips.7
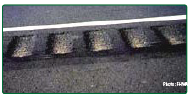
Milled Rumble Strips
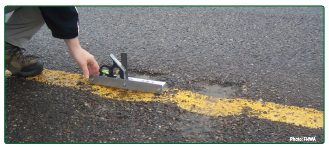
Milled rumble strips are made by a machine with a rotary cutting head that creates a consistent shape and size groove into the pavement. An example of milled rumble strips can be seen in Figure 4.
The milling machine head used to install rumble strips can be modified to cut the exact desired dimensions, spacing, and shape of agency-specified rumble strips into the pavement. As with any construction operation, having an agency inspector and the contractor together at the onset of the milling operation is a key to successful rumble strip installation. Inspectors should be aware that the effective depth of the rumble strip is measured to the highest point within the bottom of the groove, the depth to which the tire will drop, rather than to the lower surfaces where the milling teeth cut, as illustrated in Figure 5. Inspectors also need to consider where measurements will be taken if different slopes are involved. In sections with crown, center line rumble strips will be deepest at the center if the tires of the milling machine straddle the crown, or may taper off on one side significantly if both tires are to one side. This can also occur on shoulder rumble strips if the shoulder has a different cross-slope than the main line, as shown in Figure 6. Together, the inspector and contractor can assess different milling techniques to meet the needs of the site conditions.
Agencies should specify cleaning and disposing requirements for milled debris within the contract. For example, some agencies require debris to be swept, collected, and discarded after rumble strips have been installed. Other agencies may allow millings to be discarded by sweeping debris into the roadside.
In terms of the length of time it takes to install rumble strips, several contractors report being able to place between 2.5 and 4 miles of rumble strip per hour, resulting in the application of 20 to 32 miles of rumble strips in an 8-hour workday.
Raised Rumble Strips
Raised rumble strips are typically 2- to 12-inch wide rounded or rectangular markers or strips that are fastened to new or existing pavements with epoxy. Some road agencies use products that can be inlaid with the thermoplastic pavement marking. Heights also vary based on the product used. However, all are restricted to warmer climates that do not require snow removal because, to be effective, they must be above the surface of the pavement, where they could be damaged by snow plow operations, rather than recessed. Figure 7 shows an example of raised rumble strips.
Agencies should be sure to have inspectors present during installation to ensure the devices used are spaced appropriately and located per the plans either within the pavement markings or at the appropriate offset. It is also critical that the devices adhere properly to the pavement so they do not become projectiles when vehicle tires cross them.


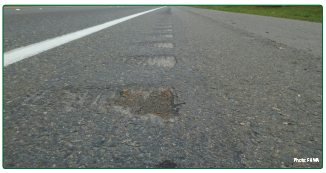
All rumble strips are essentially "self-cleaning," as snow, ice, rain, or sand do not typically remain for any length of time; this is attributed to the wind created by passing vehicles. Milled rumble strips typically require little to no maintenance.8 Missouri, South Carolina, Pennsylvania, and Washington DOTs all reported no use of preventative maintenance treatments on their rumble strips. According to a technical advisory from FHWA in 2011, asphalt fog seals can be used over milled-in rumble strips where there are deterioration concerns, as shown in Figure 8. The purpose of fog sealing rumble strips is to reduce oxidation and moisture penetration into the pavement.9 Although fog seals have been commonly used over rumble strips in the past, many States have discontinued using them due to a lack of documented findings that prove added value to pavement life. South Carolina DOT also reports that fog seals proved to be incompatible with thermoplastic pavement markings.10 Similarly, Missouri DOT reported that the fog seal was unnecessary when installing rumble stripes because the rumble strip is sealed by the pavement marking paint.11 Keep in mind that raised rumble strips do require maintenance, particularly those that include raised pavement markers that can become loose over time.
Several agencies have specific considerations and experiences related to maintaining existing rumble strips during pavement overlays and chip seal applications. Some agencies re-install the rumble strips immediately, as part of the resurfacing project, while others choose to re-install them during area-wide rumble strip installation projects, which are scheduled at intervals (such as annually) to replace rumble strips on all recently paved projects.
Surface preparation when paving over existing rumble strips also varies. Some agencies have found that simply overlaying the rumble strip works adequately, while others mill out the rumble strips and either inlay or overlay. Many agencies mill the pavement before placing the new asphalt overlay – the rumble strip is removed by this standard milling process, thus the situation of treating existing rumble strips is not experienced in many new asphalt overlays.
Chip seals on top of existing rumble strips have been shown to retain the basic shape of the rumble, although some cross section may be lost. As mentioned previously, it is not advisable to mill in rumble strips after chip sealing as agencies have in many cases observed delamination of the chip seal in the area surrounding the rumble.
While micro-surfacing fills in existing lines of rumble strips, a fresh line of rumble strips can be cut into the overlay at the same location without significant delamination occurring. Michigan DOT requires that, prior to applying the top course of micro-surface, pavement be cleaned and existing rumble strips filled either by a leveling course or a separate pass.
Center line and edge line rumble strips are very effective in reducing crashes. Rumble strips can be milled into new pavement or retrofitted on existing pavements. In areas without snow plowing, raised rumble strips are sometimes used. Many agencies that have retrofitted milled rumble strips into a significant portion of their existing two-lane highway system have found only isolated incidences of pavement deterioration. Other agencies typically only place rumble strips on pavement that is less than 5 years old. If the age, condition, type, or thickness of the pavement is a concern, modified rumble strip dimensions may be appropriate. Knowledge of how to address rumble strips with preventive maintenance treatments is sparse but growing.
Where problems were found milling across joints, pavement experts have typically concluded that joints were in poor condition, and construction techniques for joints require improvement. Where concerns about milling into joints exist, alternative rumble strip designs may avoid milling across the joint. Inspecting rumble strips is simple but necessary to ensure this safety countermeasure performs as designed. Virtually no maintenance is required for rumble strips until the pavement is overlaid or reconstructed.
The following resources provide more details related to rumble strip use and design:
FHWA, Office of Safety:
Cathy Satterfield
cathy.satterfield@dot.gov
(708) 283-3552
FHWA Resource Center:
Andy Mergenmeier
Andy.Mergenmeier@dot.gov
(410) 962-0091
For more information on Rumble Strip Implementation Guide: Addressing Pavement Issues on Two-Lane Roads, visit:
FHWA Office of Safety
http://safety.fhwa.dot.gov/
1 FHWA, "Technical Advisory T 5040.39: Shoulder and Edge Line Rumble Strips," Revision 1, November 7, 2011. Available at: http://safety.fhwa.dot.gov/roadway_dept/pavement/rumble_ strips/t504039/ [ Return to note 1. ]
2 FHWA, "Technical Advisory T5040.40: Center Line Rumble Strips," Revision 1, November 7, 2011. Available at: http://safety.fhwa.dot.gov/roadway_dept/pavement/rumble_strips/ t504040/ [ Return to note 2. ]
3 D. J. Torbic, J. M. Hutton, et al., NCHRP Report 641: Guidance for the Design and Application of Shoulder and Centerline Rumble Strips, Transportation Research Board, National Cooperative Highway Research Program (Washington, DC: TRB, 2009), Table 67. Available at http:// onlinepubs.trb.org/onlinepubs/nchrp/nchrp_rpt_641.pdf [ Return to note 3. ]
4 Ibid. [ Return to note 4. ]
5 Washington Department of Transportation, Pavement Policy, (WSDOT: June 2011). [ Return to note 5. ]
6 E.R. Russel and M.J. Rys, NCHRP Synthesis 339: Centerline Rumble Strip – A Synthesis of Highway Practices, Transportation Research Board, National Cooperative Highway Research Program (Washington, DC: TRB 2005). [ Return to note 6. ]
7 Interview with John Miller, Joe Jones, Ashley Reinkemeyer, Michael Curtit, and John Donahue, Missouri DOT, conducted on June 5-6, 2013. [ Return to note 7. ]
8 E.R. Russel and M.J. Rys, NCHRP Synthesis 339: Centerline Rumble Strips – A Synthesis of Highway Practices, Transportation Research Board, National Cooperative Highway Research Program (Washington, DC: TRB 2005). [ Return to note 8. ]
9 FHWA, "Technical Advisory T 5040.39: Shoulder and Edge Line Rumble Strips," Revision 1, November 7, 2011. Available at: http://safety.fhwa.dot.gov/roadway_dept/pavement/rumble_strips/t504039/ [ Return to note 9. ]
10 Interview with Mark Hunter, David Rogers, Andy Johnson, Brett Harrelson, Joey Riddle, Rob Bedenbavgh, and David Cook, South Carolina DOT, conducted on January 23, 2013. [ Return to note 10. ]
11 Interview with John Miller, Joe Jones, Ashley Reinkemeyer, Michael Curtit, and John Donahue, Missouri DOT, conducted on June 5-6, 2013. [ Return to note 11. ]

