U.S. Department of Transportation
Federal Highway Administration
1200 New Jersey Avenue, SE
Washington, DC 20590
202-366-4000
| < Previous | Table of Contents | Next > |

 Project Viewer is the user interface that allows you to access Paradox's options they include AR, Tables, I Forms, Queries, SQL, Reports, Scripts, and Libraries. PMMS focuses on Tables and Scripts. When you highlight any option, you WiIIsee a listing on the right hand side of the screen. This listing includes each specific file that can be accessed for that option. In the example given, you will notice that the right hand side of the screen shows all of the database tables that can be accessed in the Tables submenu.
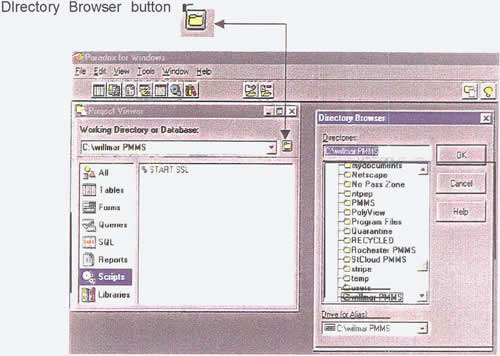
The Directory Browser will appear. Locate and click on your directory, and click OK.
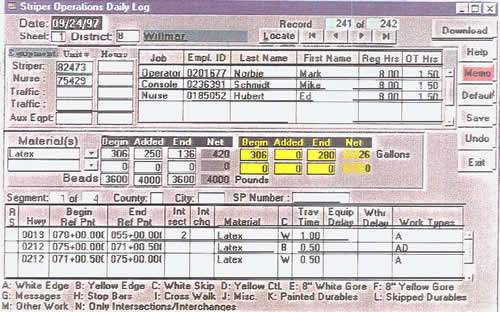
Main (Maintenance) Input Screen
The main screen will be broken into sections for further discussion
The header section at the top of the screen WIII be broken Ian parts for funher discussion
The parts include Date, Sheet, Distriict, Record Number ,and the five Locate buttons

As you can see, the Data field is highiighted (i.e , black), which indicates that this is the active field Date is a required field. A required field is one that must have information entered into it before the program will allow you to move on In other words, further data entry will not be allowed until a date is entered.
The default setting for Sheet is one. The majority of the time you will need only one sheet. One reason for changing this number would be if two crews were working on the same day, as for example, when two crews are using the same equipment, but are working two different shifts.
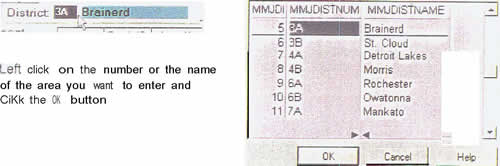
The District name and number Can be entered by using a submenu (Lookup help) option. Using your mouse. left click in the District box. The box will turn black, indicating that it is the active field. Leave your mouse pointer over the box and right click. The following supporting data input screen will pop up.
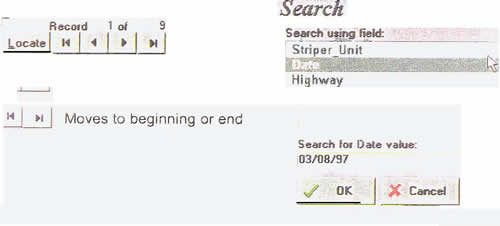
The Locate and arrow buttons allow you to search through your records The counter (eg. The example below shows 1 of 9) above the arrow buttons reveals the number of the currently displayed record, and the total number of records entered to date to locate a specific record. click on the Locate button. This wiii bring up the Search screen The three options you have for searching for a specific record include Striper Unit Dtae, or Highway Once you have selected a field for your search, and entered a search value, click the OK button. To search individual records use the arrow buttons.
Once the input screen opens the menu bar will change to File, Record, Options, and Reports. Enter the sub-menus by left clickrng on the menu option, or use the keystrokes that are identified on the right of the menu option. For example, New Record can be used by either clicking on the New Record sub-menu or try hitting the ins (i.e. the insert,) key on your keyboard.
 File
File
Left click on file and again ob exit to close the input screen.
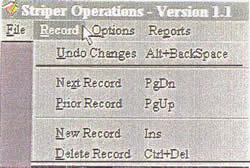 Record
Undo Changes will undo any changes that were made to the input screen since the iast save.
Next Record and Prior Record are options that can be used to scroll from one record to another
Click the New Record to start a new days data entry
Use the Delete Record option to remove (delete) the current record from the file
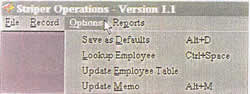 Options
Save as Defaults allowvs you to keep the current equipment numbers, Job
classifications. employee names, employee numbers, and hours. When you start to enter another day's data the defaults will automatically be entered. Use the Update Employee Table to add/remove employees to the Striper Employee Table. This is the sub-table (lookup Help table) that can be used to quickly add/change employees.
Click Updafe Memo option to gain access the current records Memo field.
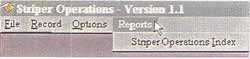 Reports
Striper Operation Index is an report the will outline the date, district, striper unit, and operator for each day of production.
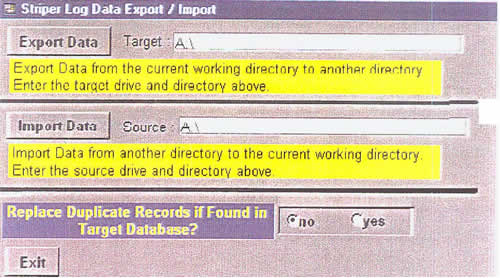
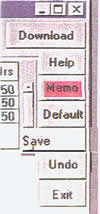 There are seven buttons on the right side of the data input screen: Download, Help, Menu, Default, Save, Undo, and Exit.
Download
The download button is designed to automatically allow you to move your
data between sources. This option can also be used to bacn up your data. The terms used to express this are Export or Import. To activate the download feature simply move your mouse over tne download button and left click.
Download Screen
| < Previous | Table of Contents | Next > |

